Sunday 25 September 2016

Essie Parka Perfect

Essie – Parka Perfect


This is the formulation I have been waiting for from Essie, it is truly beautiful. It glided on smoothly leaving behind a trail of perfection; the colour is perfectly described in the name, it is that true parka colour with a grey/green/blue we have all loved in the coat.

I adored this colour so much when it became tatty I removed and re applied for a second week. The first layer goes on very thin but layered lovely; I created this look with 3 layers in total and finished with Leighton Denny Fast Finish top coat.

My ring is from Gemporia and is a simple design which I adore; it is all focused on the one triangle of Madagascan Ruby. I love Gemporia as it only uses natural gemstones and this ruby is the deepest of reds and one of my favourite pieces I own.

Thanks for reading


Nicola

Tuesday 13 September 2016

Cheshire Cat look 2 ways

Cheshire Cat inspired nail art

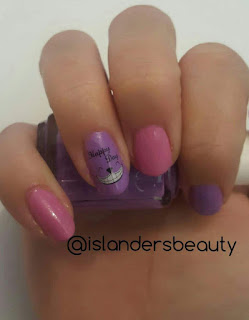
I have created 2 Cheshire cat looks; my first look is using pink and purple stripes with a smiling Cheshire and the second look is simple alternated nail colour and nail transfer.

Striped Cheshire Cat

Step One – Prep work

For this look you will need
  • Pink Polish – I used Leighton Denny ‘Pink Promenade’ (review Here)
  • Purple Polish – I used Essie Sittin Pretty
  • French manicure tip guide stickers
  • Top coat
  • Nail transfers

Step Two – Base colour


As a base colour I used the pink colour first as it created a cleaner look when the purple was added, when I tried it with the purple first the stripes where less defined and look blurred rather than the crisp look I wanted. I think a bubble gum pink like ‘Pink Promenade’ is the best shade of pink for this look as the original Disney version really pooped.

Paint all your nails with a full coverage to get the solid colour, I used 2 coats. Make sure the pink layers are fully dry before continuing to the next step, I waited a couple of hours before I moved on.

Step Three – Creating the stripes


I wanted a curved stripe rather than a perfect straight edge due to the Cheshire Cat being slightly plump. To get the curved stripes I used French manicure tip guides; I used two tip guides per nail at differently levels.

Step Four – Adding the purple


Once all your nails have their stickers applied you need to add your purple colour; for my purple I chose Essie Sittin Pretty. Carefully apply the colour over your full nail don’t worry about going over the stickers you will pull them off any way.

Step Five – Remove Tip Stickers


This step can be nerve wracking; my advice is go slowly, very slowly. If you feel the pink layer is lifting try removing the sticker from the other side of your nail. If the colour does lift from underneath don’t worry, simply fill back in with the pink nail colour and a small brush.

Step Six – Adding the smile


This step doesn’t need to be added as the stripes look great however I had the perfect nail transfers for the job. I simply added a smiling happy day cat face transfer to my ring finger (nail transfer step by step can be found Here)

Step Seven – Finishing touch


As a final step for this look is to add your top coat, this is important to seal all the colours together and gives a smooth finish.

The second look is very simple; alternate your nail colours between Pink and Purple. This gets the colour ways of the original Disney colours. I added the same nail transfer as the more advanced look on my ring finger.

The ring pictured in this look is a genuine Swiss Blue Topaz ring from Gemporia; this is honour of my fourth wedding anniversary which blue topaz is the anniversary gemstone.  

I hope you like both looks and they have inspired you to try either one.

Thanks for reading


Nicola Malloch

Leighton Denny Pink Promenade

Leighton Denny – Pink Promenade


I love Leighton’s formulas; I have reviewed a lot of different brands of nail polish lately and I can honestly say that Leighton’s is one of my favourites if not my favourite.

Every now and then a girl has to get her pink on, and when that time comes this is my go to colour. It is bubblegum pink with a slight shimmer caused by a microscopic silver glitter that isn’t noticeable to the colour but gives that reflective shimmer in the light. I would say it is a few shades lighter than So LA also by Leighton Denny.

The formulation is smooth and easy to apply with a medium size brush. I highly recommend this colour and Leighton Denny as a brand.

Thanks for reading


Nicola M

Sunday 4 September 2016

Nail Transfers

Nail Transfers


Regular visitors to my blog will know that I love my nail brands and everything to do with them; I never wear false nails as I feel they can cause a lot of damage to your natural nail for a short term gain so I tend to avoid at all costs. Having natural nails doesn’t mean that you have to have boring nails either I love changing my nails regularly from neutrals to bright and darks; never be afraid of trying new colours or unusual colours as it is so easily removed you don’t have to worry if you don’t like it. This post is all about nail transfers and how to do it with lots of pictures to help you along the way.

Firstly you need to have painted your nails, I chose Essie Urban Jungle (review here) as it works as a great neutral to show off the floral nail transfers at their best.

Step One – Prep work

Make sure you have everything you need ready to go and within grabbing reach as the whole process happens really quick.
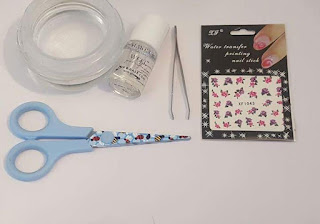
You will need
  • Transfer Pack (I picked mine up from eBay for pence)
  • Scissors
  • Tweezers
  • A bowl of water
  • Top coat
  • Tissue (you may not need this)

Step 2 – Choosing your transfers

In a pack of Nail Transfers you will have multiple images around a similar theme for you to choose between. Mine are all floral so I chose a larger double rose and a smaller individual rose to create a full nail look. Once you have chosen your transfers simply cut around that design; it doesn’t need to be neat or precise as the backing comes away.

Step 3 – Removing the backing

Using your tweezers carefully hold your transfer in water (warm water if it’s in the winter) for 10-15 seconds until you can slip the transfer away from the backing. I check every few seconds by removing from the water and gently dragging the design off the backing. Be careful with this step as if the transfer folds in on itself you can’t save it and will need to go back to step 2.

Step 3 – Positioning

I do this step very quickly as to reduce the chance of the transfer folding in on itself, once your backing is removed and you are left with the clear backed design move straight on to your nail; you should be able to move the design around due to the water from removing the backing I try to slide across my nail rather than lifting once again to reduce the risk of damaging the transfer. Once you have positioned your transfer either carry on to step 4 or as I did repeat with the second transfer.

Step 4 – Sealing the Image

This is the most important step as if you do not apply your top coat the transfer will just slip off. If you still have any moisture from the transfer left from removing the backing use some tissue to carefully dab away the liquid. Carefully apply your top coat try not to move the transfers around as you will really struggle to reposition them after this point.

In this particular set I only used the transfers on my ring fingers and simply added a singular crystal on all my other nails; making my roses more prominent and special. This look reminds me of an English summer with full roses everywhere, it would make a great wedding look but I like mine for an every day look.

I hope you like my step by step and that it helps you out. I am also including quick guide for future reference. 


Thanks for reading

Nicola

xxx

Tuesday 23 August 2016

Ciate - Cream Tea

Ciate – Cream Tea


This is the 3rd or 4th colour I have used by Ciate and I have to say I have started to love their fat thick brush. I think it takes a bit of practise to get use to the chunky style but it does make life easier when you get used to it, it has made home manicures a breeze allowing me to apply the colour in two sweeps on a nail.


The colour of Cream Tea is stunning it fits perfectly in the taupe family with a slight mushroom tone but it is shot through with a microscopic gold glitter which is barely visible to the eye but leaves a beautiful sheen on the nail. The sheen when it is caught in the sunlight makes it stunning and almost glows from within. I truly love this colour it is perfect for work and play; if you are a fan of Leighton Denny Supermodel you will be a huge fan of this colour I highly recommend this colour.

Thanks for reading


Nicola 

Monday 15 August 2016

Essie Im Addicted

Essie – I’m Addicted


Beautifully blue; this shade is truly stunning. It is a bright blue without being neon, I really adore it however it was a nightmare to put on. As I discussed with my first experience of Essie the formulation is very thin and even with a full colour rather than sheer it took me 4-5 coats to get that full coverage look and even with the multiple layers it still looks streaky on my middle finger. I find that really disappointing, the price of Essie is around the £8 mark so they aren’t the cheapest and I expect more from my nail varnish brands but maybe I have been spoilt by just using Leighton Denny for a few years where two coats is more than enough. I will continue to try Essie as it is such a prominent brand in the nail industry and they have such a wide selection of colours and textures, I hope this was just a one off bad bottle. One of the positives about Essie is that they dry extremely quickly allowing you to get on with your day. 

Until next time

Nicola

xx

Wednesday 10 August 2016

Essie Hubby For Dessert

Essie Hubby For Dessert

I brought this range of nail varnish purely through the amount of pictures I see on Twitter from other beauty bloggers as they say ‘Bloggers Made Me Do It’.

This is my first experience with Essie and I have got to say I am not disappointed; the bottles are lovely and ergonomic for their square shape they are comfortable to hold and I love that the branding is embossed on the bottle with simple white caps I think I looks classic and easily distinguishable from my other nail varnish brands.

The formula itself I found really watery; now as this is my first experience with Essie I don’t know if it’s across the board or more because this is a sheer colour so a lighter formula. For the look I created it took 5 layers to get the coverage and colour I was expecting, this is entirely my fault as I was going off of other photos when I purchased rather than reading the description which clearly said sheer. The first layer was almost invisible when I applied giving me a huge amount of disappointment but as the layers built I was once again happy with my purchase. The colour itself looks almost pearlised on my nails with the slightest hint of lilac shot through it. The brush is a wide spaying brush meaning it covers your whole nail when pressure is applied on your nail.

From the name you can probably tell its part of the wedding range but I wanted to show that it can be worn any time (I have been married 4 years and don’t plan on doing it again any time soon). I personally feel this will be a great work colour as it is not over powering or distracting; it in fact lifts your whole hand creating an almost glow to your skin and leaves your nails looking polished. Its also an easy look to wear outside of work also as it will go with all your outfits.

Overall my first experience with Essie is a good one and I highly expect to write more reviews soon on other colours.

Thanks for reading

Nicola

xx

Sunday 7 August 2016

Makeup Revolution Baked Shadows

Makeup Revolution London Baked Eye shadow

I am a huge fan of baked make up; my foundation, blushers and some of my favourite eye shadows are all baked but are by Laura Geller (who I cant recommend enough) so when I saw the Make Up Revolution version at a fraction of the price I was so excited I brought all 3 varieties I could see. I brought Beyond Eden which is the green version, Electric Dreams which is the purple version also Pure and Innocent the more neutral in tone. On first appearance the shadows look stunning; perfect little metallic orbs floating on a black background, the packaging is great simple shapes that create a dramatic effect focusing purely on the eye shadows. This is one of the very few good points of these products.

Beyond Eden
 

On first appearances the colours in this palette are so exciting the bottle green metallic sheen of 2 of the little orbs look stunning with a perfectly cream for highlighting and finally 2 mink brown/ pink shades. I couldn’t wait to dive in so like all eye shadow reviews I swatch on my arm first to get a guide of which colours will work where once on my eye; oh how disappointed I was once I did. The colours are muted, lacking in pigment making the colours seem flat and insipid. I did a look on my eye (pictured below) the colours aren’t strong enough in pigment to stand alone in a look leaving a muddy puddle look on my eye.

Electric Dreams
 

Hoping that Beyond Eden was a one off and the product would improve I carried on; the lilac and purple shades in this palette are my normal go to colours as I feel they make my eye colour pop and bring out different shades of blue from my eyes. However this palette has even less pigment within the colours than the green shades; I had to go over and over the colour on my arm to make it visible to the camera and my eye. I tried to create a look on my eye however the pigments would not show and I refused to dram my poor eyes any more to try and show the colours.

Pure & Innocent
 

Of all 3 palettes this has the strongest pigment and would be the only one I would consider buying again. The pink shades are lovely and subtle but clearly visible; the brown shades are shot through with gold and leave a lovely colour when combined with the pink. The only shade that overly disappointed was the palest cream shade which did not show on my skin. Beware that if you use this palette glitter sheds every where whilst applying meaning I looked like a mermaid afterwards and not in a good way.

Overall I would not buy there baked shadows again but I have previous loved Make Up Revolution lipsticks so I think I will stick with them.

Thanks for reading


Nicola 

Monday 1 August 2016

Original Source green banana & bamboo milk

Original Source Green Banana & Bamboo Milk

My first question when I picked up this product was what does green banana and bamboo milk smell like?

To be honest I still can’t tell you what either of them smells like even after using the shower gel multiple times in the shower. What I think it smells like is sherbet; the kind you find in refresher sweets that fizzy fresh fragrance that I personally don’t find offensive in fact it is really nice. It is by far the subtlest fragrance I have found with Original Source shower gels; they are normally bursting with juiciness and fill your shower with a true to life fruit or herb explosion this one is slightly lacking that experience for me.

This shower gel does have many plus points:-
·         Vegan friendly
·         Tested only on humans (big plus in my opinion)
·         100% natural fragrance
·         Natural Moisturisers

On that last point the natural moisturisers are brilliant they left my skin moisturised for hours; my skin felt silky and to know that was done with natural elements is great peace of mind on my delicate skin. Whilst using the gel it creates luxuriously thick bubbles that are created with small amounts of product needed meaning they last ages.

Overall I don’t think I would buy this particular fragrance again but I would definitely buy from the ‘With milk’ range for the moisturising qualities and I always seek out their fruity shower gels for the fragrance. I highly recommend Original Source products.

Thanks for reading

Nicola

xxx

Thursday 28 July 2016

Hair On Brush & Bobbles

Hair On Brush and Bobbles

I received both Hair On products in Glossy Boxes


I had never heard of Hair On before receiving them, but thank the lord I now do. I have extremely long thick wavy hair that tangles quickly and is normally a nightmare to brush; however this miracle blue mini brush is amazing. It detangled my hair with no fuss, there was no tugging or pain I have never brushed my hair so easily in my life. I highly recommend this product and to replace is only £7 bargain in my opinion.

The crease free bobbles are spirals of plastic which is normally the sort of thing I keep away from my hair as it does tangle so easily but these bobbles are brilliant. They allow me to put my hair in a pony tail or bun without leaving a huge crease across the middle of my hair, as my hair os so thick they stretch out so only last half the day before I need to swap for another one but my hair is ridiculously thick. I leave the bobbles till the next day and they have returned back to normal size and shape.

Overall I will be sorting out Hair On for more products as I have nothing but praise for this brand.

Thanks for reading

Nicola

xxx

Wednesday 13 July 2016

original source mango shower gel

Original Source – Mango Shower Gel

This is my first review on Original Source products but is in no way my first experience with them; in my house hold these shower gel go like hot cakes and I never get to review them before they are in the shower.

Using the mango showering gel is like being in a star burst; the fragrance is amazing and feels your bathroom it has a real citrus sharpness that I love with the mango sweetness. It lathers lovely and makes your shower a very fruity experience.

The products are made in the UK with all natural products which I love it is also tested on humans not animals, vegan friendly, the bottle is recyclable and uses all natural fragrance oil. What more could you ask for in a humble shower gel.

I highly recommend Original Source; we currently have 3 on the go in our shower and I always give them in gift hampers at Christmas and birthdays.

Thanks for reading

Nicola

xx

Tuesday 12 July 2016

bee good plump & firm

Bee Good Plump & Firm moisturiser

I received this in May 2016 Glossy Box.

Firstly I love the packaging; the light blue tube has a honeycomb patterning in the back ground with super cute little bees flying around the tube. The applicator is a thin nozzle which I squeezed on to my finger for applying rather than directly on to my skin as this gives me greater control. The thin nozzle allows you to apply small amounts of moisturiser so you do not over load your skin.

I applied on freshly cleansed skin and it made my skin feel smooth and moisturised over night; I only used it on targeted areas around my mouth, my eyes and forehead. I don’t need the plumping action just yet but those are the areas that are always affected first due to the skin be thinner.

The product itself is made in the UK by British bees and contains no parabens, synthetic colours, mineral oils, SLS or SLES. I really enjoyed using this product and would definitely consider purchasing again. I look forward to seeing what else Bee Good have in their product line.

Thanks for reading

Nicola

xx

Monday 11 July 2016

Absolute new york Lolita

Absolute New York Velvet Lippie ‘Lolita’

I received this lipstick in May 2016 Glossy Box.

I have been on the hunt for a good liquid lipstick; so far I have been disappointed. They are normally gloopy and sticky and more like a lip-gloss than a lipstick. However this may be my long lost lipstick; it glides on effortlessly leaving a solid colour without need to ‘cake it on’ to get the same effect as a traditional bullet lipstick.

The colour looks really bright up close but from a slight difference it creates the look of healthy pink full lips. The texture is like butter and leaves your lips feeling smooth and soft through out the day.

I highly recommend this product and cant wait to look at more products from the company. I had never heard of them before but that is one of the joys of Glossy box you always get something new.

Thanks for reading.

Nicola

Xx

Saturday 9 July 2016

Leighton Denny Morning Dew

Leighton Denny – Morning Dew

If you are looking for a summery teal this colour is perfection. It screams summer for me; visits to the beach and long days of sun or if like me and you live in gloomy grey England then at least this colour can transport you to a sunny location.

I am a huge lover of Leighton’s products and colours however this one didn’t go on great, it didn’t go on with a smooth motion like normal it was dragging and took four coats to get level. I hope this was a once off as I have not experienced this before with Leighton’s nail varnish.

Thanks for looking

Love
Nicola

xx

**Edit**
After publishing this post Leighton Denny arranged a replacement product to be sent. Great customer service. 

Thursday 30 June 2016

Tsum Tsum collecting

Disney Tsum Tsum Collection

I have put off buying any Tsum Tsums as I am the kind of person who goes from 0-100 in 5 seconds and knew that after I brought one my collection would grow quickly. For those who dont know what Tsum Tsums are i have taken a picture of the tag that comes on all your Tsum Tsums as they can explain it better than me. Me and the kids call Tsum Tsums disney hamsters as they have the cute squishy look like chubby little hamsters.


 I am a true Disney addict and love everything from the films, the parks and all the toys and collectables. This post I will be constantly updating with Tsum Tsums as I buy them to show everyone my collection how it grows, I will date all updates as I go. I have a 4 year old little boy and a 1 year old little girl so as I buy them they have to be evenly sexed or world war 3 breaks out.

My first 2 – the beginning 30/6/2016
Miles Morales Mini


Maximus Mini


7th July 2016
Gamora mini


1st august 2016
Finnick mini


20th August 2016
Queen of heart mini


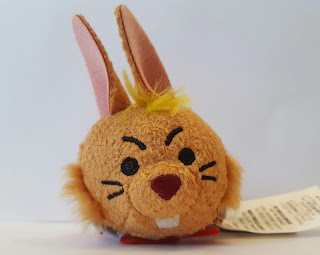
Hare mini (Alice in wonderland)
 

Dormouse mini (Alice in wonderland)
 
Hope you like my new Alice in wonderland trio as much as I do.


Thanks for looking

Nicola