Sunday, 25 September 2016

Essie Parka Perfect

Essie – Parka Perfect


This is the formulation I have been waiting for from Essie, it is truly beautiful. It glided on smoothly leaving behind a trail of perfection; the colour is perfectly described in the name, it is that true parka colour with a grey/green/blue we have all loved in the coat.

I adored this colour so much when it became tatty I removed and re applied for a second week. The first layer goes on very thin but layered lovely; I created this look with 3 layers in total and finished with Leighton Denny Fast Finish top coat.

My ring is from Gemporia and is a simple design which I adore; it is all focused on the one triangle of Madagascan Ruby. I love Gemporia as it only uses natural gemstones and this ruby is the deepest of reds and one of my favourite pieces I own.

Thanks for reading


Nicola

Tuesday, 13 September 2016

Cheshire Cat look 2 ways

Cheshire Cat inspired nail art

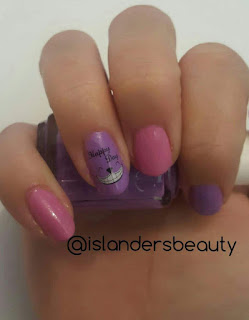
I have created 2 Cheshire cat looks; my first look is using pink and purple stripes with a smiling Cheshire and the second look is simple alternated nail colour and nail transfer.

Striped Cheshire Cat

Step One – Prep work

For this look you will need
  • Pink Polish – I used Leighton Denny ‘Pink Promenade’ (review Here)
  • Purple Polish – I used Essie Sittin Pretty
  • French manicure tip guide stickers
  • Top coat
  • Nail transfers

Step Two – Base colour


As a base colour I used the pink colour first as it created a cleaner look when the purple was added, when I tried it with the purple first the stripes where less defined and look blurred rather than the crisp look I wanted. I think a bubble gum pink like ‘Pink Promenade’ is the best shade of pink for this look as the original Disney version really pooped.

Paint all your nails with a full coverage to get the solid colour, I used 2 coats. Make sure the pink layers are fully dry before continuing to the next step, I waited a couple of hours before I moved on.

Step Three – Creating the stripes


I wanted a curved stripe rather than a perfect straight edge due to the Cheshire Cat being slightly plump. To get the curved stripes I used French manicure tip guides; I used two tip guides per nail at differently levels.

Step Four – Adding the purple


Once all your nails have their stickers applied you need to add your purple colour; for my purple I chose Essie Sittin Pretty. Carefully apply the colour over your full nail don’t worry about going over the stickers you will pull them off any way.

Step Five – Remove Tip Stickers


This step can be nerve wracking; my advice is go slowly, very slowly. If you feel the pink layer is lifting try removing the sticker from the other side of your nail. If the colour does lift from underneath don’t worry, simply fill back in with the pink nail colour and a small brush.

Step Six – Adding the smile


This step doesn’t need to be added as the stripes look great however I had the perfect nail transfers for the job. I simply added a smiling happy day cat face transfer to my ring finger (nail transfer step by step can be found Here)

Step Seven – Finishing touch


As a final step for this look is to add your top coat, this is important to seal all the colours together and gives a smooth finish.

The second look is very simple; alternate your nail colours between Pink and Purple. This gets the colour ways of the original Disney colours. I added the same nail transfer as the more advanced look on my ring finger.

The ring pictured in this look is a genuine Swiss Blue Topaz ring from Gemporia; this is honour of my fourth wedding anniversary which blue topaz is the anniversary gemstone.  

I hope you like both looks and they have inspired you to try either one.

Thanks for reading


Nicola Malloch

Leighton Denny Pink Promenade

Leighton Denny – Pink Promenade


I love Leighton’s formulas; I have reviewed a lot of different brands of nail polish lately and I can honestly say that Leighton’s is one of my favourites if not my favourite.

Every now and then a girl has to get her pink on, and when that time comes this is my go to colour. It is bubblegum pink with a slight shimmer caused by a microscopic silver glitter that isn’t noticeable to the colour but gives that reflective shimmer in the light. I would say it is a few shades lighter than So LA also by Leighton Denny.

The formulation is smooth and easy to apply with a medium size brush. I highly recommend this colour and Leighton Denny as a brand.

Thanks for reading


Nicola M

Sunday, 4 September 2016

Nail Transfers

Nail Transfers


Regular visitors to my blog will know that I love my nail brands and everything to do with them; I never wear false nails as I feel they can cause a lot of damage to your natural nail for a short term gain so I tend to avoid at all costs. Having natural nails doesn’t mean that you have to have boring nails either I love changing my nails regularly from neutrals to bright and darks; never be afraid of trying new colours or unusual colours as it is so easily removed you don’t have to worry if you don’t like it. This post is all about nail transfers and how to do it with lots of pictures to help you along the way.

Firstly you need to have painted your nails, I chose Essie Urban Jungle (review here) as it works as a great neutral to show off the floral nail transfers at their best.

Step One – Prep work

Make sure you have everything you need ready to go and within grabbing reach as the whole process happens really quick.
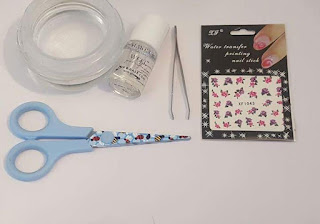
You will need
  • Transfer Pack (I picked mine up from eBay for pence)
  • Scissors
  • Tweezers
  • A bowl of water
  • Top coat
  • Tissue (you may not need this)

Step 2 – Choosing your transfers

In a pack of Nail Transfers you will have multiple images around a similar theme for you to choose between. Mine are all floral so I chose a larger double rose and a smaller individual rose to create a full nail look. Once you have chosen your transfers simply cut around that design; it doesn’t need to be neat or precise as the backing comes away.

Step 3 – Removing the backing

Using your tweezers carefully hold your transfer in water (warm water if it’s in the winter) for 10-15 seconds until you can slip the transfer away from the backing. I check every few seconds by removing from the water and gently dragging the design off the backing. Be careful with this step as if the transfer folds in on itself you can’t save it and will need to go back to step 2.

Step 3 – Positioning

I do this step very quickly as to reduce the chance of the transfer folding in on itself, once your backing is removed and you are left with the clear backed design move straight on to your nail; you should be able to move the design around due to the water from removing the backing I try to slide across my nail rather than lifting once again to reduce the risk of damaging the transfer. Once you have positioned your transfer either carry on to step 4 or as I did repeat with the second transfer.

Step 4 – Sealing the Image

This is the most important step as if you do not apply your top coat the transfer will just slip off. If you still have any moisture from the transfer left from removing the backing use some tissue to carefully dab away the liquid. Carefully apply your top coat try not to move the transfers around as you will really struggle to reposition them after this point.

In this particular set I only used the transfers on my ring fingers and simply added a singular crystal on all my other nails; making my roses more prominent and special. This look reminds me of an English summer with full roses everywhere, it would make a great wedding look but I like mine for an every day look.

I hope you like my step by step and that it helps you out. I am also including quick guide for future reference. 


Thanks for reading

Nicola

xxx