Cheshire Cat inspired nail art
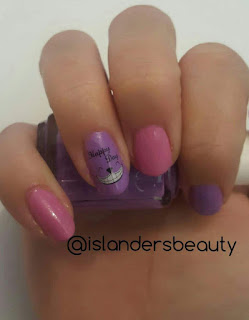
I have created 2 Cheshire cat looks; my first look is using
pink and purple stripes with a smiling Cheshire and the second look is simple
alternated nail colour and nail transfer.
Striped Cheshire Cat
Step One – Prep work
For this look you will need
- Pink Polish – I used Leighton Denny ‘Pink Promenade’ (review Here)
- Purple Polish – I used Essie Sittin Pretty
- French manicure tip guide stickers
- Top coat
- Nail transfers
Step Two – Base colour
As a base colour I used the pink colour first as it created
a cleaner look when the purple was added, when I tried it with the purple first
the stripes where less defined and look blurred rather than the crisp look I wanted.
I think a bubble gum pink like ‘Pink Promenade’ is the best shade of pink for
this look as the original Disney version really pooped.
Paint all your nails with a full coverage to get the solid
colour, I used 2 coats. Make sure the pink layers are fully dry before
continuing to the next step, I waited a couple of hours before I moved on.
Step Three –
Creating the stripes
I wanted a curved stripe rather than a perfect straight edge
due to the Cheshire Cat being slightly plump. To get the curved stripes I used French
manicure tip guides; I used two tip guides per nail at differently levels.
Step Four –
Adding the purple
Once all your nails have their stickers applied you need to
add your purple colour; for my purple I chose Essie Sittin Pretty. Carefully apply
the colour over your full nail don’t worry about going over the stickers you
will pull them off any way.
Step Five –
Remove Tip Stickers
This step can be nerve wracking; my advice is go slowly,
very slowly. If you feel the pink layer is lifting try removing the sticker
from the other side of your nail. If the colour does lift from underneath don’t
worry, simply fill back in with the pink nail colour and a small brush.
Step Six – Adding
the smile
This step doesn’t need to be added as the stripes look great
however I had the perfect nail transfers for the job. I simply added a smiling
happy day cat face transfer to my ring finger (nail transfer step by step can
be found Here)
Step Seven –
Finishing touch
As a final step for this look is to add your top coat, this
is important to seal all the colours together and gives a smooth finish.
The second look is very simple; alternate your nail colours
between Pink and Purple. This gets the colour ways of the original Disney
colours. I added the same nail transfer as the more advanced look on my ring
finger.
The ring pictured in this look is a genuine Swiss Blue Topaz
ring from Gemporia; this is honour of my fourth wedding anniversary which blue
topaz is the anniversary gemstone.
I hope you like both looks and they have inspired you to try
either one.
Thanks for reading
Nicola Malloch


Such a cute tutorial and your nails are so pretty! I love the shades you chose too and the Gemporia ring is gorgeous, it accents them so well :D xx
ReplyDeleteelizabeth ♡ ”Ice Cream” whispers Clara | (lets follow each other on bloglovin or instagram)
Thank you I love playing around with my nails xxx
Delete